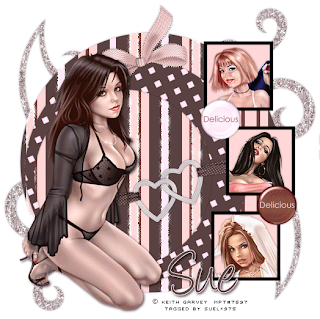
This tutorial was written by me on 22 October 2008.
Any similarities to other tutorials are completely coincidental
and unintentional. I try and keep my tutorials as simple as
possible, but they are written assuming you have a good
working knowledge of PSP and Animation Shop
YOU WILL NEED:-
Template 62 by Missy which you can get HERE
Chocomallow scrapkit from Misfitsscrapz HERE
Four tubes of choice (one main and three for the smaller squares. I am
using artwork by Keith Garvey. You will need a licence to
use his artwork which you can purchase HERE.
Please do not use the same images unless you have a licence
OK, let's get started :)
1. Open all your supplies in PSP and minimize for now. Open template 62,
make a duplicate and close the original
2. Highlight circle 1 layer. Selections, select all, float, defloat. Keep selected.
Copy and paste paper 6 as a new layer. Selections, invert and delete.
Deselect and add a small dropshadow
3. Highlight circle 2 layer. Selections, select all, float, defloat. Keep selected.
Copy and paste paper 4 or another paper of choice as a new layer. Selections,
invert and delete. Deselect and add the same dropshadow
4. Highlight the frame layer, and using the magic wand select inside the top square.
Selections, modify, expand by 4. Keep selected. Copy and paste a tube and when
happy with placement go to selections, invert and delete. Deselect
5. Follow step 4 above for the remaining two squares using different tubes.
Merge the three tube layers together and add a dropshadow
6. Highlight the frame background layer. Using your magic wand select inside
the three squares. Selections, modify, expand by 3. Keep selected. Add a new raster
layer and floodfill with a pale colour to compliment your tube and the scrapkit. Deselect
7. Add your main tube now, resizing as necessary and add a dropshadow.
Add a few elements of your choice and your name and copyright
TO ANIMATE:-
1. Make two copies of your circle 1 layer so you end up with three circles.
Rename them circle 1, circle 2 and circle 3
2. On circle 1 layer use your magic wand to select random stripes of the paper.
Keep selected then add xenofex constellation with the following settings:-
Star size - 2.00
Size variation - 51
Edge star density - 63
Overall star density - 0
Overdrive - 100
Twinkle amount - 47%
Twinkle rotation 45
Keep original image
Random seed 1
DO NOT DESELECT YET!!
2. Highlight circle 2 layer - your stripes should still be selected. Add
xenofex constellation again with the same settings but hit the random
seed button once.
3. Still with your stripes selected, highlight layer 3.
Add xenofex again but hit the random seed button again.
You can now deselect
4. Hide your circle layers 2 and 3, and highlight circle 1. Edit, copy merged
and paste into animation shop (AS) as a new animation
5. Back in PSP, hide circle 1 and unhide circle 2. Make sure circle 2 layer is
highlighted and go to edit, copy merged and in AS go to edit, paste
after current frame
6. Back in PSP again hide circle 2 and unhide circle 3. Make sure circle
3 layer is highlighted and edit, copy merged. Back in AS go to edit and paste
after current frame
7. View animation and save as a GIF file
Thanks for trying my tutorial :)


No comments:
Post a Comment