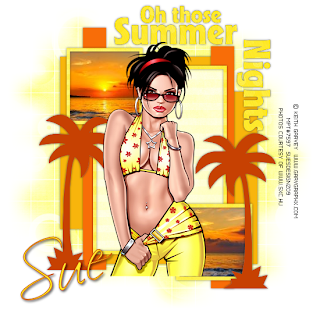
Browsing through loads of blogs yesterday and came across Melissa's Creationz
Well she has some amazing templates on there and as soon as I saw this one I had to make a tut using it - Grease is one of my favourite films and I would love to see the musical version of it. Maybe one day!
This tutorial was written by me on 8th May 2009.
Any similarities to other tutorials are completely
coincidental and unintentional. I try to make
my tutorials as simple as possible but they are
written assuming you have a good working knowledge
of PSP and Animation Shop
SUPPLIES NEEDED:-
Template 52 from Melissa's Creationz HERE
Sunny Days scrapkit from Bel Vidotti HERE
Mask 84 from Weescotslass HERE
2 sunset images - mine are from www.sxc.hu
Font of choice - I am using Scriptina
Tube of choice - I am using the artwork of Keith Garvey.
You must have a licence to use his work which you can
purchase from MPT HERE
Ready? Then let's go!
Open your supplies in PSP and minimise for now
Oh, and apologies for this one, I was all over the place making it! It seems a little long winded but it's a nice easy tut
1. Make a duplicate of the template and close the original. Delete the copyright layer. Highlight the square frames layer and using your magic wand select inside the top square. Then go to selections, modify and expand by 2. Copy and paste one of the sunset images as a new layer then go to selections, invert and hit delete on your keyboard. Repeat this step with the bottom square and when finished drag the square frame layer above the sunset images
2. Highlight the square frame layer again. Go to selections, select all, float and defloat. Copy and paste paper 5 as a new layer then go to selections, invert and hit delete. Add a small dropshadow and then delete the original square frame layer
3. Copy and paste your tube as a new layer and add a small dropshadow. When happy with the placement X it out for now while you work on the rest of your tag
4. Highlight the wordart layer. Go to selections, select all, float and defloat. Copy and paste paper 2 as a new layer then go to selections, invert and hit delete. Add a small dropshadow and delete the original wordart layer
5. Repeat the above step on the rectangle layer using paper 6
6. Repeat again on the rectangle frame layer using paper 2
7. Repeat for the dotted line layer using paper 5. I colourized my paper using hue 34 and saturation 255
8. On the narrow rectangles layer go to selections, select all, float and defloat. Floodfill with a dark orange colour from your sunset image
9. On the background square layer do the same again but using a lighter orange colour from the sunset image
10. Do the same for the palm trees layer, using a dark orange again
11. Add a new raster layer and send this to the bottom of all your other layers. Copy and paste paper 9 as a new layer and apply the mask. Ungroup layers and resize the mask by 110%
12. Add your name and copyright and that's it, all done!
Thanks for trying my tutorial


No comments:
Post a Comment