This tutorial was written by me on 29th March 2009
Any similarities to other tutorials are completely coincidental
and unintentional. I try and keep my tutorials as simple as
possible, but they are written assuming you have a good
working knowledge of PSP and Animation Shop
SUPPLIES NEEDED:-
SWALK freebie add on kit from Candy's Treats HERE
You will probably need to go back a few posts to find it
Masks 12 and 190 from Weescotslass HERE
Font of choice. I am using Al Sandra
Two tubes of choice from the same artist. I am using the
artwork of Keith Garvey. You will need a licence to use his work
which you can purchase at MPT HERE
Ready? Then let's get started. Make sure your supplies are open in PSP before you start
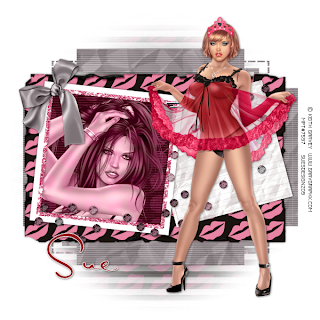
1. Open a new image 600 x 600 and floodfill white. Copy and paste a paper of choice as a new layer. Apply WSL mask 12
2. Copy and paste another paper of choice as a new layer and apply WSL mask 190. Rotate the mask layer to the right by 90. Go to effects and apply Cybia screenworks effect fine rule using the default settings.
3. Copy and paste frame 3 as a new layer and add a small dropshadow. Using your magic wand click inside the square. Go to selections, modify and expand by 10. Copy and paste a paper of choice as a new layer then go to selections, invert and hit delete on your keyboard. Drag this layer beneath the frame layer. Keep selected, and copy and paste one of your tubes as a new layer into the square. Selections, invert and delete. You can now deselect. Change the blend mode on your tube to luminance legacy
4. Copy and paste your other tube as a new layer and place to the right of your tag. Add a small dropshadow
5. Copy and paste the silver bow as a new layer and resize by 30%. Add a dropshadow and sharpen once.
6. Add your name and copyright and your'd done!
Thanks for trying my tutorial


No comments:
Post a Comment