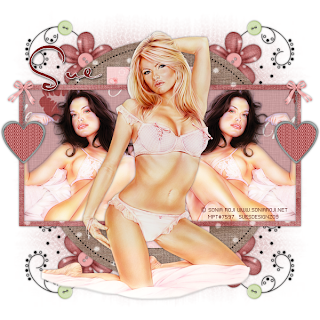
This tutorial was written by me on 24th January 2009
Any similarities to other tutorials are completely coincidental
and unintentional. I try and keep my tutorials as simple as
possible, but they are written assuming you have a good
working knowledge of PSP and Animation Shop
SUPPLIES NEEDED:-
Make sure your mask is minimised in PSP
1. Open up the template in PSP. Make a duplicate (shift D) and close the original. Delete the copyright layer, highlight the white background layer and go to image, canvas size and increase canvas size to 600 x 600. You will probably need to floodfill the rest of the canvas white
2. Highlight the white background layer and copy and paste a paper of choice as a new layer. Go to layers, new mask layer from image. Select EBDMask55 from the dropdown and make sure source luminance is checked, then press ok. Highlight the mask layer and delete. Answer yes to the box that pops up. Highlight the layer that says "group", right click on this layer and ungroup layers
3. Highlight raster 3. Go to selections, select all, float and defloat. Keep selected and copy and paste a paper of choice from the kit as a new layer. Go to selections, invert and hit delete on your keyboard. Deselect and give a small dropshadow of 0, 0, 50, 5. Delete the original raster 3 layer
4. Highlight raster 2. Go to selections, select all, float and defloat. Keep selected and copy and paste a paper of choice from the kit as a new layer. Go to selections, invert and hit delete on your keyboard. Deselect and give a small dropshadow of 0, 0, 50, 5. Delete the original raster 2 layer
5. Highlight raster 1. Go to selections, select all, float and defloat. Keep selected and copy and paste a paper of choice from the kit as a new layer. Go to selections, invert and hit delete on your keyboard. Deselect and give a small dropshadow of 0, 0, 50, 5. DO NOT DELETE THE ORIGINAL LAYER
6. Highlight copy of raster 1. Go to selections, select all, float and defloat. Keep selected and copy and paste a paper of choice from the kit as a new layer. Go to selections, invert and hit delete on your keyboard. Deselect and give a small dropshadow of 0, 0, 50, 5. DO NOT DELETE THE ORIGINAL LAYER
7. Highlight raster 4. Go to selections, select all, float and defloat. Keep selected and copy and paste a paper of choice from the kit as a new layer. Go to selections, invert and hit delete on your keyboard. Deselect and give a small dropshadow of 0, 0, 50, 5. Delete the original raster 4 layer
8. Highlight copy of raster 4. Go to selections, select all, float and defloat. Keep selected and copy and paste a paper of choice from the kit as a new layer. Go to selections, invert and hit delete on your keyboard. Deselect and give a small dropshadow of 0, 0, 50, 5. Delete the original copy of raster 4 layer
9. Highlight raster 1. Using your magic wand select inside the square. Copy and paste your tube as a new layer, making sure it's above the square paper layer. Position your tube to where you want it then go to selections, invert and hit delete on your keyboard. Deselect and give a small dropshadow of 0, 0, 50, 5. Apply xero porcelain effect with the default settings. You can now delete the original raster 1 layer.
10. Repeat the above step for the other square which will be copy of raster 1
11. Copy and paste your main tube as a new layer. Dropshadow and resize if required. Drag your tube layer to the top of all the other layers
12. Highlight the white background layer and copy and paste flower art 1 as a new layer. Add a dropshadow. Go to layers, and duplicate the flower art layer. Then go to image and mirror. Duplicate this layer then go to image and flip. Duplicate this layer then go to image and mirror. You should end up with one flower art in each corner.
13. Copy and paste one of the hanging hearts as a new layer. Resize by 40% and add a dropshadow. Place in one of the corners of the frame. Go to layers, duplicate then image, mirror.
14. Add the apropriate copyright and your name and you're done!
Thanks for trying my tutorial
Any similarities to other tutorials are completely coincidental
and unintentional. I try and keep my tutorials as simple as
possible, but they are written assuming you have a good
working knowledge of PSP and Animation Shop
SUPPLIES NEEDED:-
Bee Mine scrapkit by Tracey at Soxsational Scraps. You can purchase the kit HERE
Mask 55 by Enchanted by Darkness which you can download HERE
Template 30 by AquaRebel315 which you can download HERE
Font of choice - I used Satisfaction
Xero porcelain effect (optional)
Two tubes of choice from the same artist. I am using the artwork of Sonia Roji.
You must have a licence to use her work which you can purchase from HERE
Make sure your mask is minimised in PSP
1. Open up the template in PSP. Make a duplicate (shift D) and close the original. Delete the copyright layer, highlight the white background layer and go to image, canvas size and increase canvas size to 600 x 600. You will probably need to floodfill the rest of the canvas white
2. Highlight the white background layer and copy and paste a paper of choice as a new layer. Go to layers, new mask layer from image. Select EBDMask55 from the dropdown and make sure source luminance is checked, then press ok. Highlight the mask layer and delete. Answer yes to the box that pops up. Highlight the layer that says "group", right click on this layer and ungroup layers
3. Highlight raster 3. Go to selections, select all, float and defloat. Keep selected and copy and paste a paper of choice from the kit as a new layer. Go to selections, invert and hit delete on your keyboard. Deselect and give a small dropshadow of 0, 0, 50, 5. Delete the original raster 3 layer
4. Highlight raster 2. Go to selections, select all, float and defloat. Keep selected and copy and paste a paper of choice from the kit as a new layer. Go to selections, invert and hit delete on your keyboard. Deselect and give a small dropshadow of 0, 0, 50, 5. Delete the original raster 2 layer
5. Highlight raster 1. Go to selections, select all, float and defloat. Keep selected and copy and paste a paper of choice from the kit as a new layer. Go to selections, invert and hit delete on your keyboard. Deselect and give a small dropshadow of 0, 0, 50, 5. DO NOT DELETE THE ORIGINAL LAYER
6. Highlight copy of raster 1. Go to selections, select all, float and defloat. Keep selected and copy and paste a paper of choice from the kit as a new layer. Go to selections, invert and hit delete on your keyboard. Deselect and give a small dropshadow of 0, 0, 50, 5. DO NOT DELETE THE ORIGINAL LAYER
7. Highlight raster 4. Go to selections, select all, float and defloat. Keep selected and copy and paste a paper of choice from the kit as a new layer. Go to selections, invert and hit delete on your keyboard. Deselect and give a small dropshadow of 0, 0, 50, 5. Delete the original raster 4 layer
8. Highlight copy of raster 4. Go to selections, select all, float and defloat. Keep selected and copy and paste a paper of choice from the kit as a new layer. Go to selections, invert and hit delete on your keyboard. Deselect and give a small dropshadow of 0, 0, 50, 5. Delete the original copy of raster 4 layer
9. Highlight raster 1. Using your magic wand select inside the square. Copy and paste your tube as a new layer, making sure it's above the square paper layer. Position your tube to where you want it then go to selections, invert and hit delete on your keyboard. Deselect and give a small dropshadow of 0, 0, 50, 5. Apply xero porcelain effect with the default settings. You can now delete the original raster 1 layer.
10. Repeat the above step for the other square which will be copy of raster 1
11. Copy and paste your main tube as a new layer. Dropshadow and resize if required. Drag your tube layer to the top of all the other layers
12. Highlight the white background layer and copy and paste flower art 1 as a new layer. Add a dropshadow. Go to layers, and duplicate the flower art layer. Then go to image and mirror. Duplicate this layer then go to image and flip. Duplicate this layer then go to image and mirror. You should end up with one flower art in each corner.
13. Copy and paste one of the hanging hearts as a new layer. Resize by 40% and add a dropshadow. Place in one of the corners of the frame. Go to layers, duplicate then image, mirror.
14. Add the apropriate copyright and your name and you're done!
Thanks for trying my tutorial


No comments:
Post a Comment