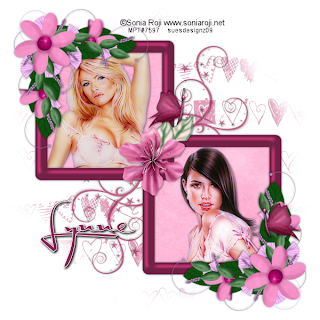
This tutorial was written by me on 14th January 2009
Any similarities to other tutorials are completely coincidental
and unintentional. I try and keep my tutorials as simple as
possible, but they are written assuming you have a good
working knowledge of PSP and Animation Shop
SUPPLIES NEEDED:-
All About Love scrapkit by Lynne at Baby Cakes Scraps which you can purchase HERE.
Mask 133 by Wee Scots Lass HERE
Font of choice - I used Al Sandra
Xero porcelain effect (optional)
Tube of choice. I am using the artwork of Sonia Roji.
You must have a licence to use her work which you can purchase from HERE
1. Open a new image 600 x 600 and floodfill white
2. Copy and paste BCS double frame as a new layer and resize by 80%.
Colorize to match one of the papers that you will be using. Add a small
dropshadow
3. Using your magic wand, select inside all areas of the frame (hold down the shift
key while using your magic wand and that way you will be able to select inside more
than one area at a time). Go to selections, modify and expand by 10. Copy and paste
BCS pink paper as a new layer then go to selections, invert and hit delete on your
keyboard. Deselect and drag the paper layer below the frame layer
4. Highlight the white background layer. Copy and paste BCS glitter overlay as a new
layer. Apply your mask and then merge group. Lower the opacity of the mask layer to
around 40 or 50%
5. Highlight the frame layer. Using your magic wand select inside one of the squares. Go to
selections, modify and expand by 10. Copy and paste your tube as a new layer, then go to
selections, invert and hit delete on your keyboard. Drag the tube below the frame layer and
give it a small dropshadow
6. Repeat the above step with the other square using a different tube of the same artist. Make sure both your tube layers are below your frame layer. Merge the two tube layers together then apply xero porcelain effect with the default settings
7. Copy and paste BCS floral cluster two as a new layer. Resize as necessary and apply a small dropshadow. Place at the top left of your tag just on the frame. Go to image, mirror and flip so the second floral cluster should be at the bottom right of your tag.
8. Copy and paste BCS blossom with leaves as a new layer. Resize as necessary and give a small dropshadow. Place this in the middle of your tag - see mine for placement
9. Add any other elements you wish from the scrapkit - I added some butterflies and one of the doodles
10. Add your name and copyright and that's it!
Thanks for trying my tutorial :)


No comments:
Post a Comment