This tutorial was written by me on 12th March 2009
Any similarities to other tutorials are completely coincidental
and unintentional. I try and keep my tutorials as simple as
possible, but they are written assuming you have a good
working knowledge of PSP and Animation Shop
SUPPLIES NEEDED:-
Open your supplies is psp but minimise for now
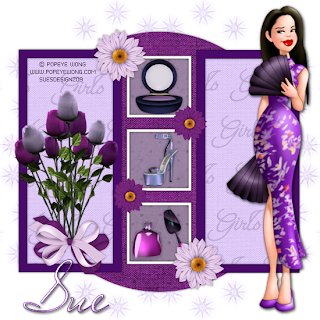
1. Open the template. Make a duplicate and close the original. Delete the copyright layer on the copy you just made. Add a new raster layer and send to the bottom but above the white background layer. Copy and paste a paper of choice from the kit and apply a mask of choice
2. Highlight raster 7 on your layers pallette then go to selections, select all, float and defloat. Keep selected and copy and paste a paper of choice as a new layer. Then go to selections, invert and hit delete on your keyboard. Give this layer a small dropshadow and delete the original raster 7 layer
3. Repeat the above step with raster layer 5 and copy of raster layer 5 using a different paper
4. Repeat once more with raster layer 4 using a different paper again
5. Highlight raster 2. Go to selections, select all, float and defloat. Keep selected and floodfill the outlines of the three squares white or another colour of your choice
6. Repeat the above step with raster layer 1 and copy of layer 1 using a dark purple or another colour of your choice
7. Copy and paste your tube as a new layer and position to the right of your tag. Add any other elements that you wish - I dotted a few flowers around the tag and one of the bows but you can use any you like
8. When happy with your tag add your name and copyright, and save as a png file
Thanks for trying my tutorial.
Any similarities to other tutorials are completely coincidental
and unintentional. I try and keep my tutorials as simple as
possible, but they are written assuming you have a good
working knowledge of PSP and Animation Shop
SUPPLIES NEEDED:-
Template 23 from AquaRebel Designz HERE
About Girls scrapkit from Scrap Dimensions HERE
Font of choice
Mask of choice. I am using one by Sophisticated Simone which you can
get from HERE
Tube of choice. I am using the awesome artwork of Popeye Wong.
You can visit his site HERE
Open your supplies is psp but minimise for now
1. Open the template. Make a duplicate and close the original. Delete the copyright layer on the copy you just made. Add a new raster layer and send to the bottom but above the white background layer. Copy and paste a paper of choice from the kit and apply a mask of choice
2. Highlight raster 7 on your layers pallette then go to selections, select all, float and defloat. Keep selected and copy and paste a paper of choice as a new layer. Then go to selections, invert and hit delete on your keyboard. Give this layer a small dropshadow and delete the original raster 7 layer
3. Repeat the above step with raster layer 5 and copy of raster layer 5 using a different paper
4. Repeat once more with raster layer 4 using a different paper again
5. Highlight raster 2. Go to selections, select all, float and defloat. Keep selected and floodfill the outlines of the three squares white or another colour of your choice
6. Repeat the above step with raster layer 1 and copy of layer 1 using a dark purple or another colour of your choice
7. Copy and paste your tube as a new layer and position to the right of your tag. Add any other elements that you wish - I dotted a few flowers around the tag and one of the bows but you can use any you like
8. When happy with your tag add your name and copyright, and save as a png file
Thanks for trying my tutorial.


No comments:
Post a Comment